Graphic Converter Basics
![]() Graphic
Converter is an image
manipulation and conversion program for the Mac. It allows you to open, create, edit, and convert images among
various
file formats for use on both Macintosh and PC computers. You can also manipulate
pictures for desktop and web publishing.
Graphic
Converter is an image
manipulation and conversion program for the Mac. It allows you to open, create, edit, and convert images among
various
file formats for use on both Macintosh and PC computers. You can also manipulate
pictures for desktop and web publishing.
Where to find this software
Graphic Converter is installed on all Mac computers in C-215 and C-220. If the Graphic Converter icon is not already in your dock, find it in your Applications folder, click on it (once!) and drag it onto the Dock.
Getting Started
Click on the name of the menu to open it. Move the mouse over the menu to highlight the desired option, then click the mouse button to select it.
Note: Menu selections that are "grayed out" cannot be selected because they are not currently available
You can also use keystrokes to perform some actions. For example, to open a new document, you can press Apple-N. The keystrokes for various actions are listed alongside the option they correspond to in the menu.
Some of the most common menu selections are listed below. If there is a corresponding keystroke for the action, it has been noted:
In the File menu
- New Image (Apple-N) - opens up a new image canvas.
- Open (Apple-O) - opens existing files or documents.
- Close (Apple-W) - closes the document currently open.
- Save (Apple-S) - saves the current document to the same name and place it was saved to last.
- Save as (Shift-Apple-S) - saves the current document under a different name and/or to a different place.
Note: When editing your picture, it is a good idea to use "Save As" to save different versions of your work under different names. This way, if you make changes you later decide you don't like, you can open up a previous version of the image and work from there rather than starting from scratch.
- In the Edit menu
- Copy (Apple-C) - copies selection
- Paste (Apple-P) - pastes copied material at the cursor.
- Undo (Apple-Z) - undoes the last step performed.
- In the Picture menu
- Zoom - changes the size of the view of the image, but does not change the actual size of the original image.
- Size > Scale (Ctrl-Apple-Y) - changes the actual size of the image.
- In the Window menu
You can see which Graphic Converter documents are active by looking at the bottom part of the Window menu. The document you are working on will have a checkmark next to it. If you have a lot of documents open at once, the easiest way to select a window that is buried under others is to click on its name in the Window menu.
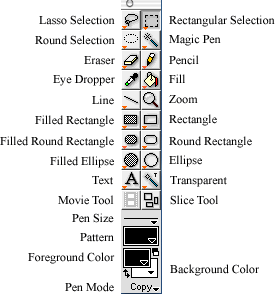
Below is the Toolbox in Graphic Converter. If you don't see it, you can open it by going to the Picture menu and selecting Show Toolbox. Tools with an orange upside-down triangle in the lower left corner indicate a supplementary dialog box for you to customize the tool. To open the dialog box for a tool, double-click on the tool if it is unselected.
Graphic Converter gives you the option of saving the graphic in a variety of formats. The most popular formats for graphics used on the web are jpeg (.jpg) and gif (.gif). For print, choose the format PICT.
- From the File menu choose Save As.
- In the Save As field, type in the name of the graphic, adding the appropriate extension at the end (i.e., .gif for gif format, .pict for PICT format).
- In the dialog box that opens, navigate to where you would like to save the file.
- Select the desired format of the graphic in the Format pull-down menu.
- Click Save.